A folio files against a ticket the client already has, of the type your template names. If they have no matching ticket, the folio still collects documents and reads them — it just doesn't sync, because there is nothing yet to sync to.
Connecting...
Tags:
crm
email
Intercom Integration
Keep your customer messaging and document collection in sync. When you connect Intercom, FolioReady automatically syncs your clients as Intercom contacts, posts document summaries as internal notes, and sends folio request emails through Intercom instead of a separate email provider. Your support team sees the full document collection story right inside Intercom.
Why Connect Intercom?
See document collection in your inbox
When a client uploads a document, FolioReady's AI reads it and posts a short plain-language summary as an internal note on the Intercom contact. Your support team sees what each file contains — without leaving Intercom.
One less email tool to manage
Without the integration, folio request emails go through a separate provider like Gmail. With Intercom connected, those emails route through Intercom's messaging system instead. Your clients receive folio requests from the same brand they already recognize from your support conversations.
Clients appear automatically
When a client is created in FolioReady, they're matched to an existing Intercom contact by email — or created as a new one. No manual data entry, no forgotten contacts.
Collected data lands on the ticket
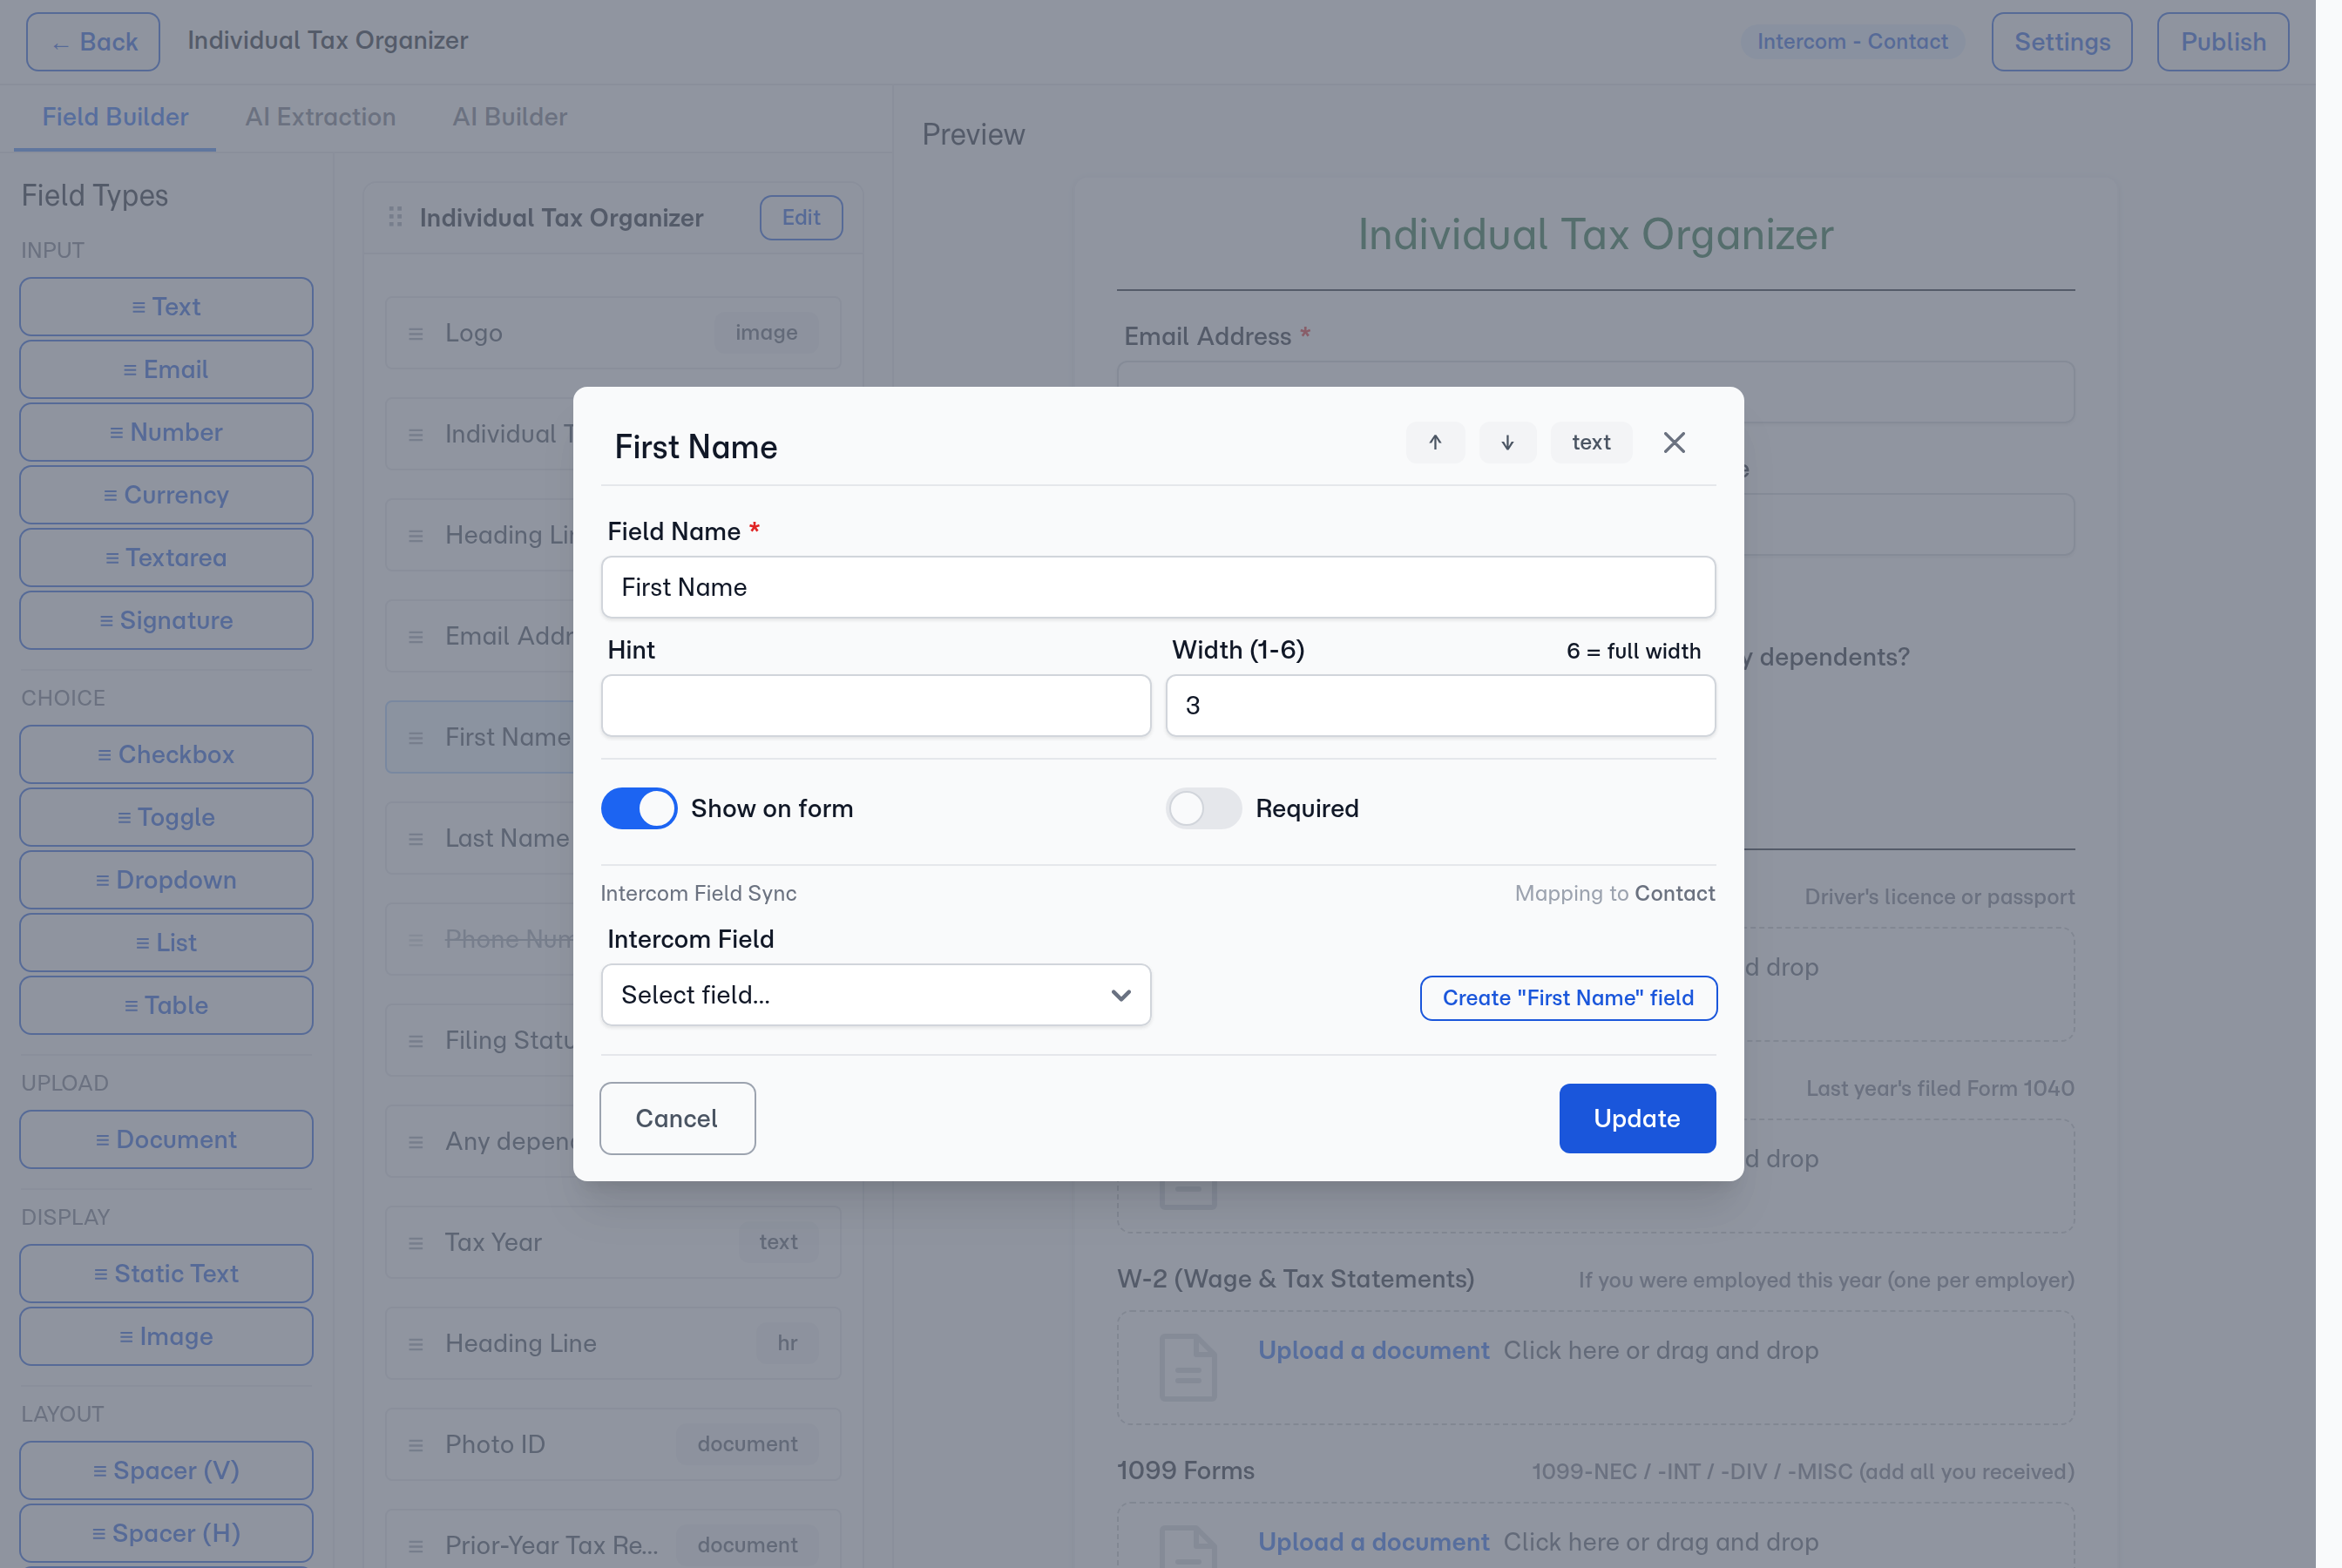
Map any field in your template to an attribute on a ticket or a conversation. When a client fills in the folio, the value is written straight onto the record your team is working from — the support ticket that prompted the request in the first place.
What You Can Do
File a folio against a ticket or a conversation
A folio files against the piece of work, not against the person. In the template builder, open Settings and set Document Target to one of your ticket types, or to Conversation.
The contact still matters — it is how a client is linked to Intercom, and how FolioReady finds which tickets and conversations belong to them. It is simply not what a folio files against, because an Intercom contact cannot hold a document.
The client needs the record first
Sync collected fields to ticket attributes
You choose what syncs. In the template builder, open a canvas field's sync settings and point it at an attribute on the target — pick an existing one, or create a new attribute without leaving FolioReady. When the client completes the folio, the collected value is written to the linked ticket or conversation.
Ticket attributes belong to a ticket type, so the fields you can map are the ones defined on the type your template targets. Conversation attributes are shared across the whole workspace.
Review document summaries in notes
When a client uploads a document, FolioReady's AI writes a short plain-language summary and posts it as an internal note on the ticket or conversation, headed "Document synopsis — [filename]".
Summaries post automatically once the AI finishes reading a document; a file that's still processing, or that couldn't be summarized, is skipped until its summary is ready.
Notes are visible to your team only — clients don't see them.
Store the documents on the record
Connecting Intercom makes it your storage destination, so every collected file is attached to the ticket or conversation the folio files against, alongside the summary of what it says. Change it any time under Settings > Integrations.
Because Intercom holds the file and serves it back, FolioReady doesn't keep a second copy — the attachment on the record is the document.
Removing a document
Deleting a document in FolioReady removes it from the folio. The copy attached to the Intercom record stays, the same way a note posted to a ticket stays — Intercom offers no way to withdraw a single attachment.
Send folio emails through Intercom
When Intercom is set as your email service, folio request emails, reminders, and updates are delivered through Intercom's messaging system. Clients see your Intercom brand and workspace identity on every message.
Import contacts from Intercom
Search your Intercom contacts by name or email and import them as FolioReady clients. Contact details are pre-filled — no manual data entry.
No duplicates
If a client with the same Intercom contact ID or email already exists, FolioReady links the existing client instead of creating a duplicate.
Prerequisites
- An Intercom workspace with admin access
- A FolioReady account on any plan
Connecting Your Account
- Navigate to Settings > Integrations in FolioReady
- Find Intercom and click Connect
- You'll be redirected to Intercom's authorization screen
- Authorize FolioReady to access your workspace
- You'll be redirected back to FolioReady — the integration is now active
Once connected, FolioReady automatically sets Intercom as your email service and CRM service. New clients and folio events sync from that point forward.
Importing Contacts
Once connected, an Import from Intercom button appears on the Clients page.
Step 1: Search for a Contact
Click Import from Intercom to open the import page. It opens on your most recently updated Intercom contacts — no need to type first — and searching by name or email narrows the list.
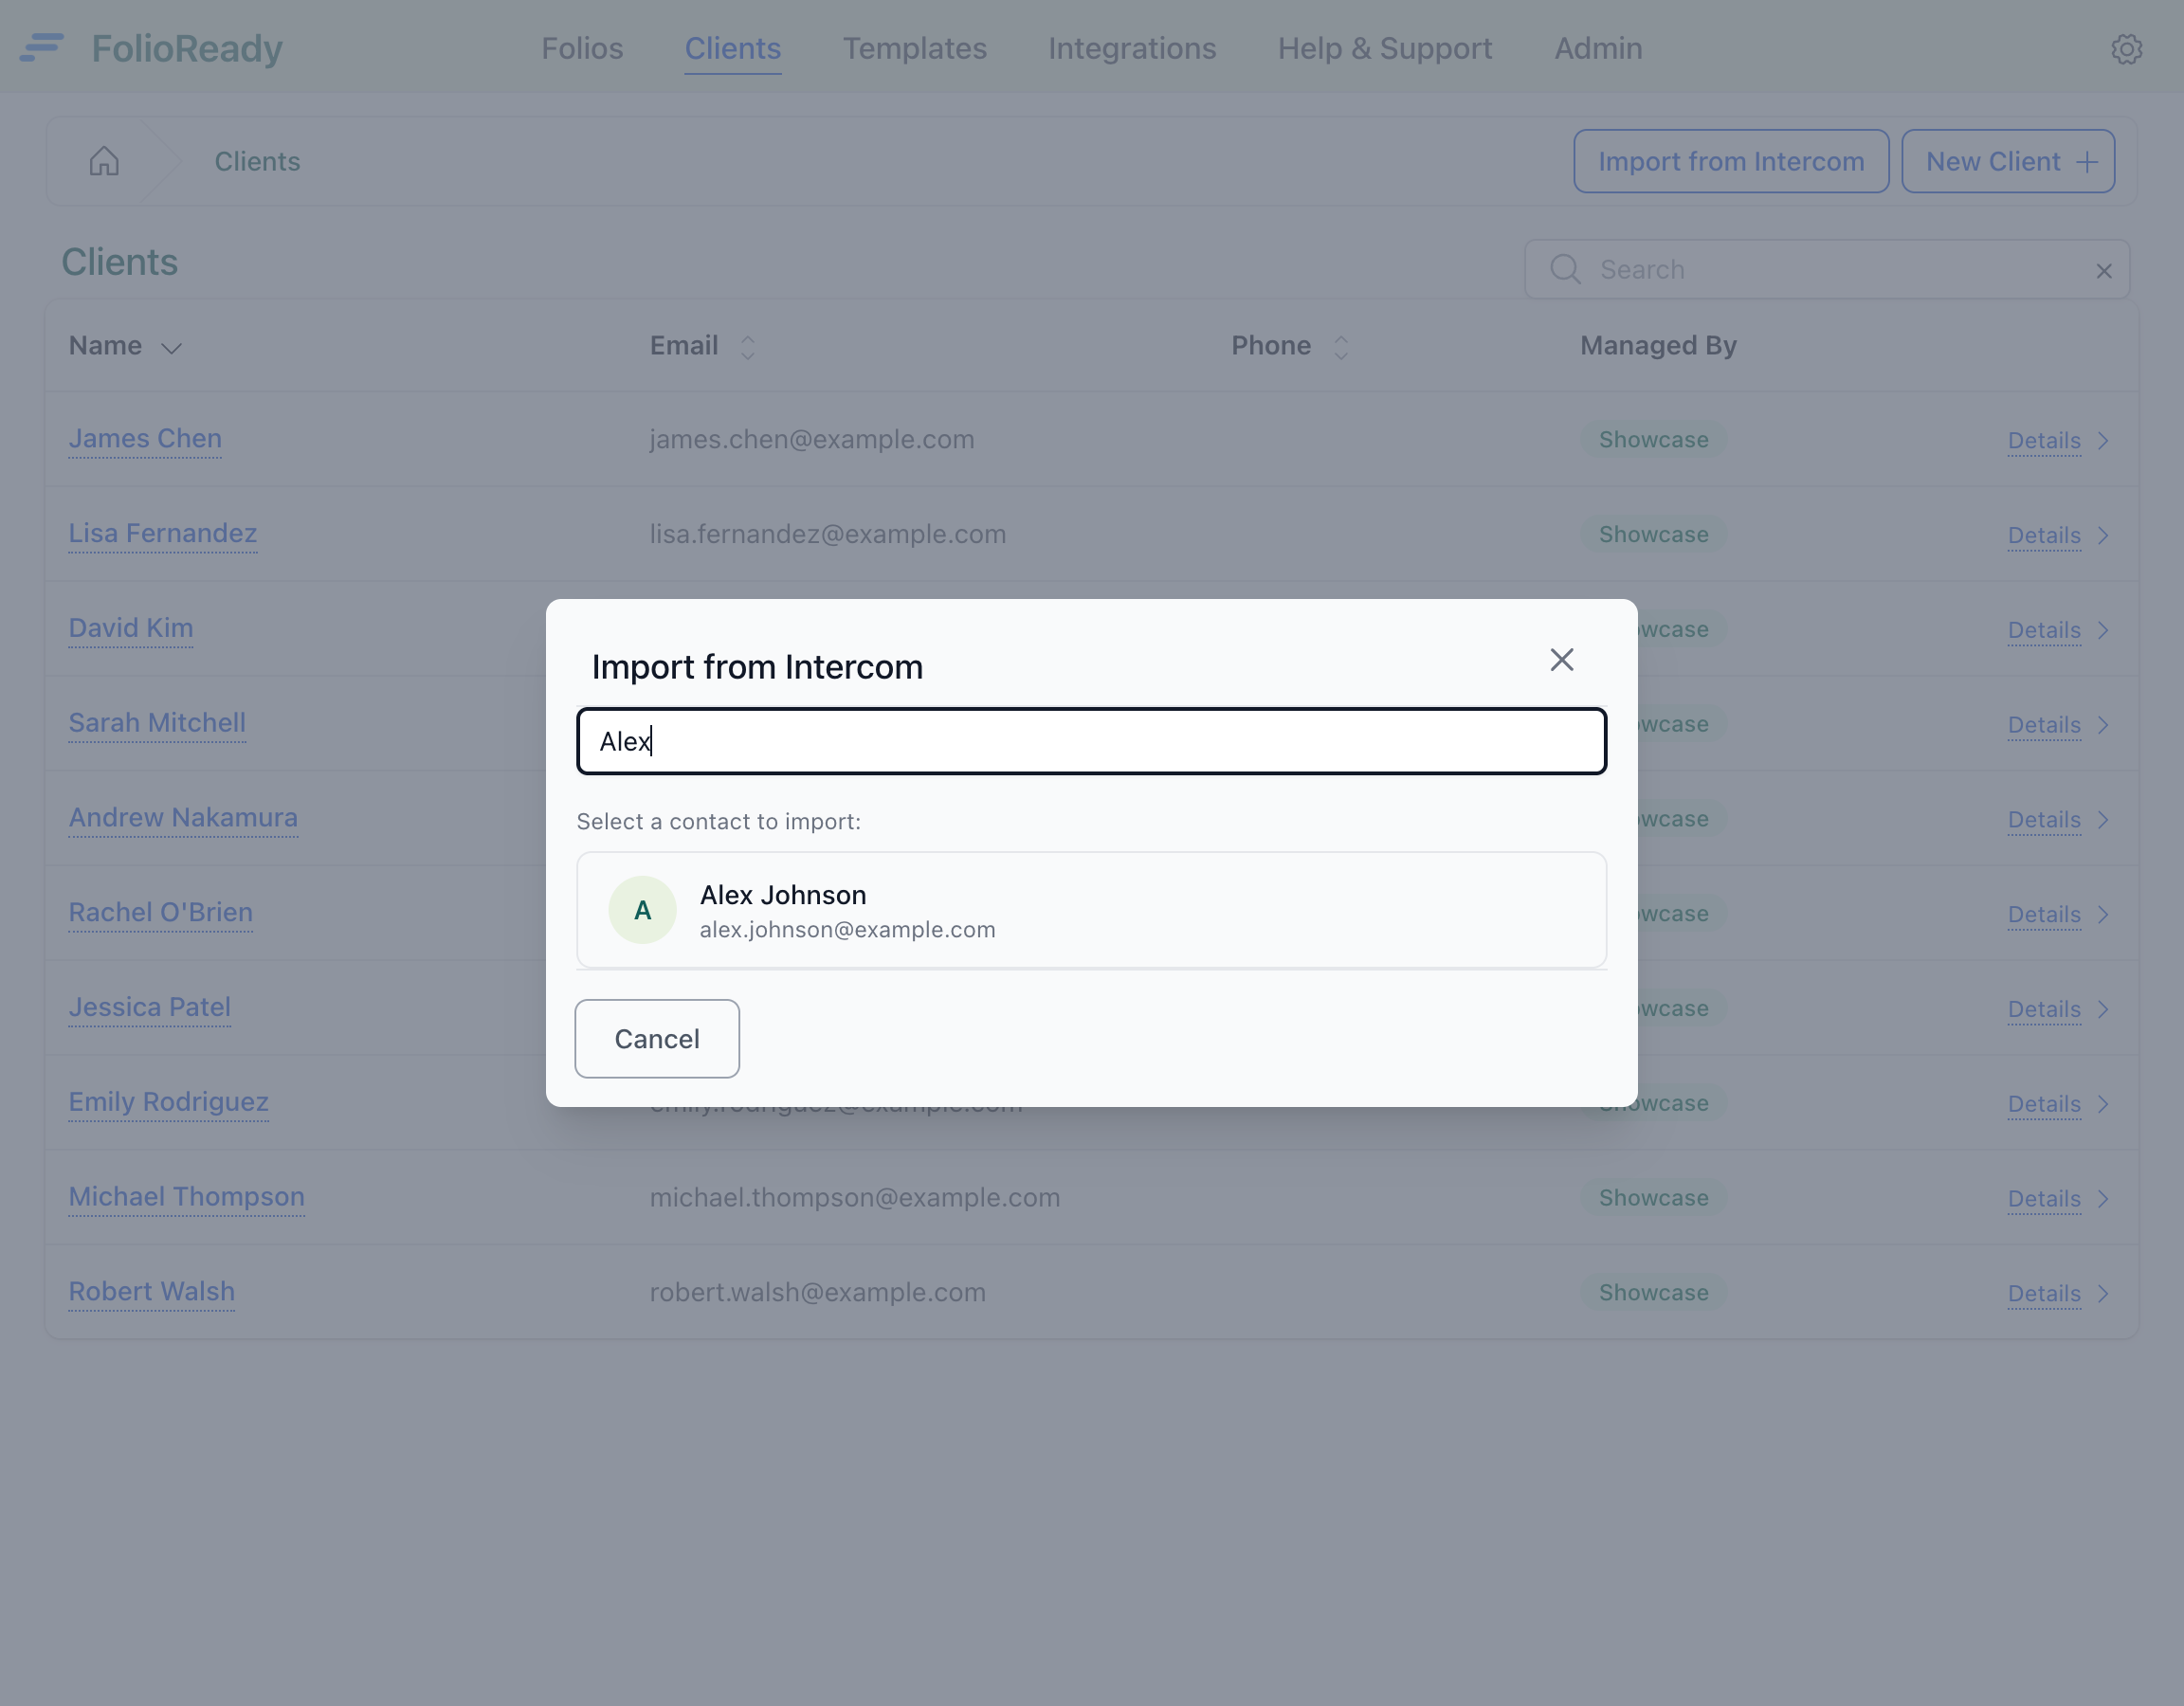
Step 2: Client Created
Press Link to Intercom on their row. The contact becomes a FolioReady client with their name and email pre-filled from Intercom, and their record opens. Pressing it on someone already in FolioReady opens the client you already have rather than creating a second — the same is true of a client you added by hand under the same email address, who is linked instead of duplicated.
How It Works
Intercom                            FolioReady                          Intercom
────────                            ───────────                         ────────
Search contacts   ◄────────────    Import from Intercom
Contact selected  ──────────────►   Client created/linked

                                    Client created     ─────────────►   Contact matched/created

                                    Template builder:
                                    Target = a ticket type
                                    Map canvas fields  ─────────────►   Read the type's attributes

                                    Choosing a target  ◄─────────────   The client's tickets
                                                                        of that type

                                    Folio completed    ─────────────►   Mapped fields written
                                                                        onto the ticket

                                    Document uploaded  ─────────────►   AI summary posted
                                                                        as a note on the ticket
                                                       ─────────────►   File attached to the ticket

                                    Email notification ─────────────►   Email sent via Messages API
All sync happens in the background. There's no delay or extra steps in your workflow — events are processed automatically as they occur.
Disconnecting
To disconnect Intercom:
- Go to Settings > Integrations
- Click Delete Connection on the Intercom integration
- Confirm the disconnection
After disconnecting, folio emails will fall back to your default email method. Contacts and notes already synced to Intercom remain there — disconnecting only stops future sync.
Troubleshooting
Emails not sending through Intercom
Check that your company's email service is set to "intercom" in Settings. If you disconnected and reconnected, the email service may need to be re-selected.
Contact not appearing in Intercom
The contact sync runs in the background and may take a few seconds. If the contact still doesn't appear, check the Events section on your integration page for any failed sync attempts.
Custom attributes not showing
An attribute only appears on a record once the client has actually submitted a value for it. Check that the field is mapped to an attribute in the template builder, and that the client has completed and submitted that field — empty fields are skipped rather than written as blanks.
Nothing is reaching Intercom
Work down the list:
- The template's Document Target. A template on No CRM sync collects documents perfectly well and sends nothing to Intercom. Set it to a ticket type or to Conversation.
- Whether the client has that record. A folio only syncs once the client has a ticket of the template's type, or a conversation. Until then it collects and reads documents but writes nothing.
- The connection status. If it shows an error, the authorization has likely been revoked — reconnect from Settings > Integrations.
The Intercom panel doesn't list templates
It isn't meant to. The panel shows the contact's folios and one button; pressing it opens FolioReady with that client and that conversation already chosen, and you pick the template there. Everything the request needs — the template, the record it files against, the review before it sends — belongs to FolioReady, so the panel doesn't hold a copy of any of it.